Recipe: Grilled Sundried Tomato Pizza

Pizza on Friday was a regular occurrence during my youth. Sometimes we would buy it from a local pizza place, but most of the time my mom would make homemade pizza.  We loved it, especially in the summer because she hated to turn on the oven, so she would use the grill. Grilled Pizza, has been a family tradition for 20+ years and is probably one of my most favorite meals.

There is just something about the crust with a grilled pizza... it's crisp on the outside and the inside is nice and soft.  I also love the fact that you can make them personal sized, so everyone can pick their own toppings.

This type of pizza is perfect for a party. My favorite house party I gave was a grilled pizza party. I set the table with all different sauces, cheese and toppings.  My guests picked what they wanted and when the dough was ready on the grill they added it to the pizza.  It was interactive and fun!

Friday is coming… Get ready and grill!

Recipe: Grilled Sundried Tomato Pizza | SavoryPantryBlog.com

Grilled Pizza

  1. Preheat your grill on high (make sure the grates are clean)
  2. Take half the dough and stretch it to the thickness you like your pizza, if you like really thin pizza I recommend using a rolling pin.  
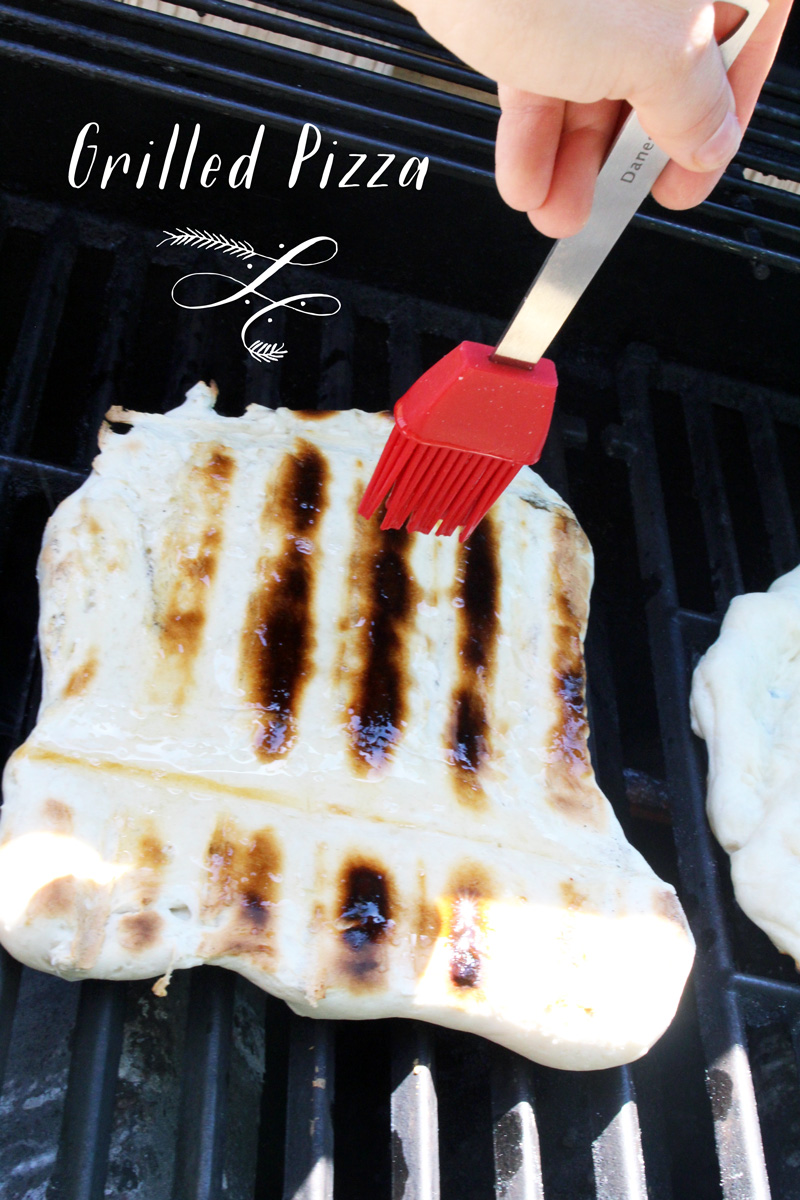
  3. Add pizza directly onto the grates of the grill and shut lid, at this time turn down the temperature to medium.  The bottom of the pizza will start getting brown and releasing from the grates (about 5 minutes), once the bottom half is light brown(or a bit on the dark side if you like a nice crunch), flip the pizza dough.  
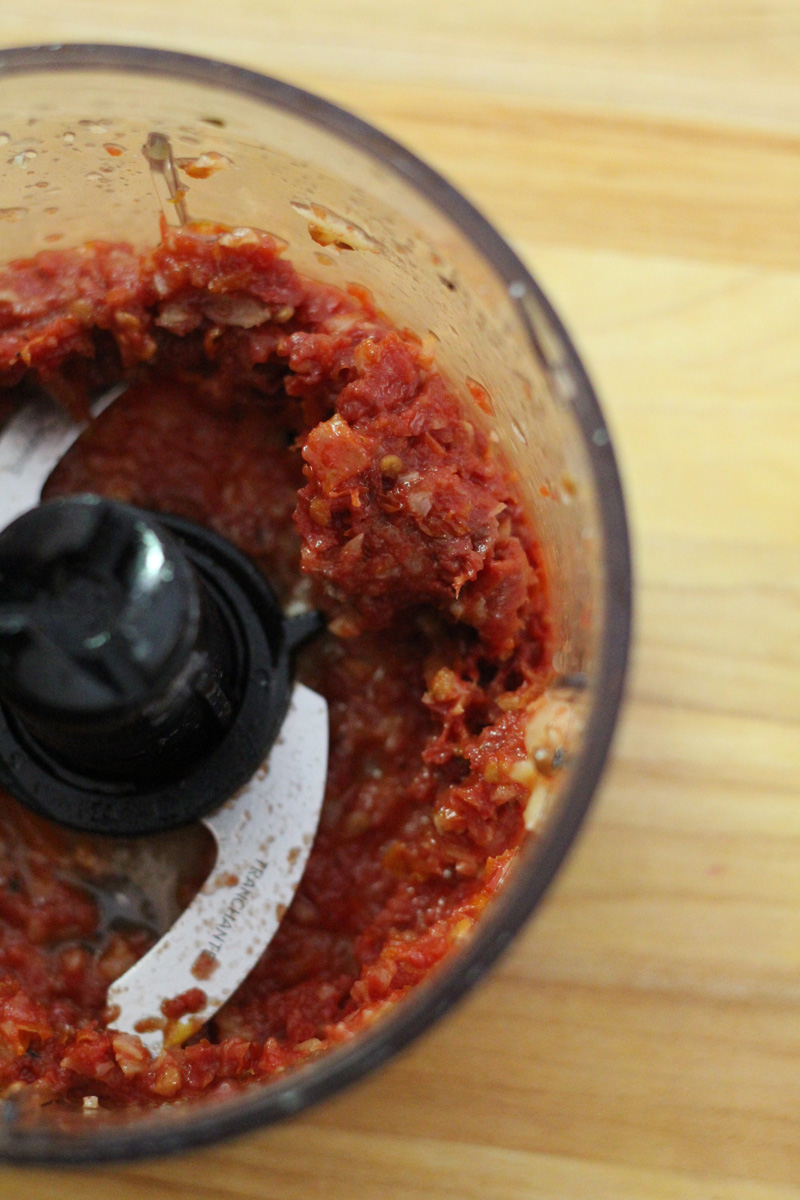
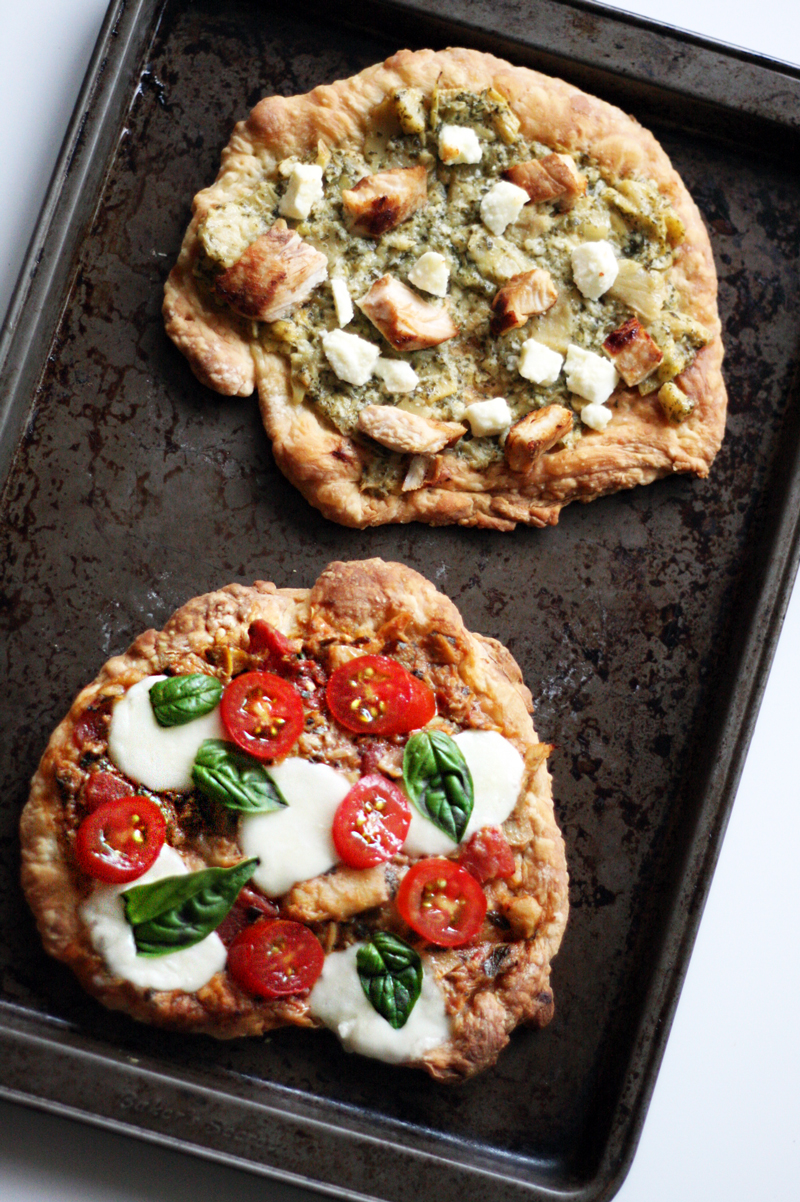
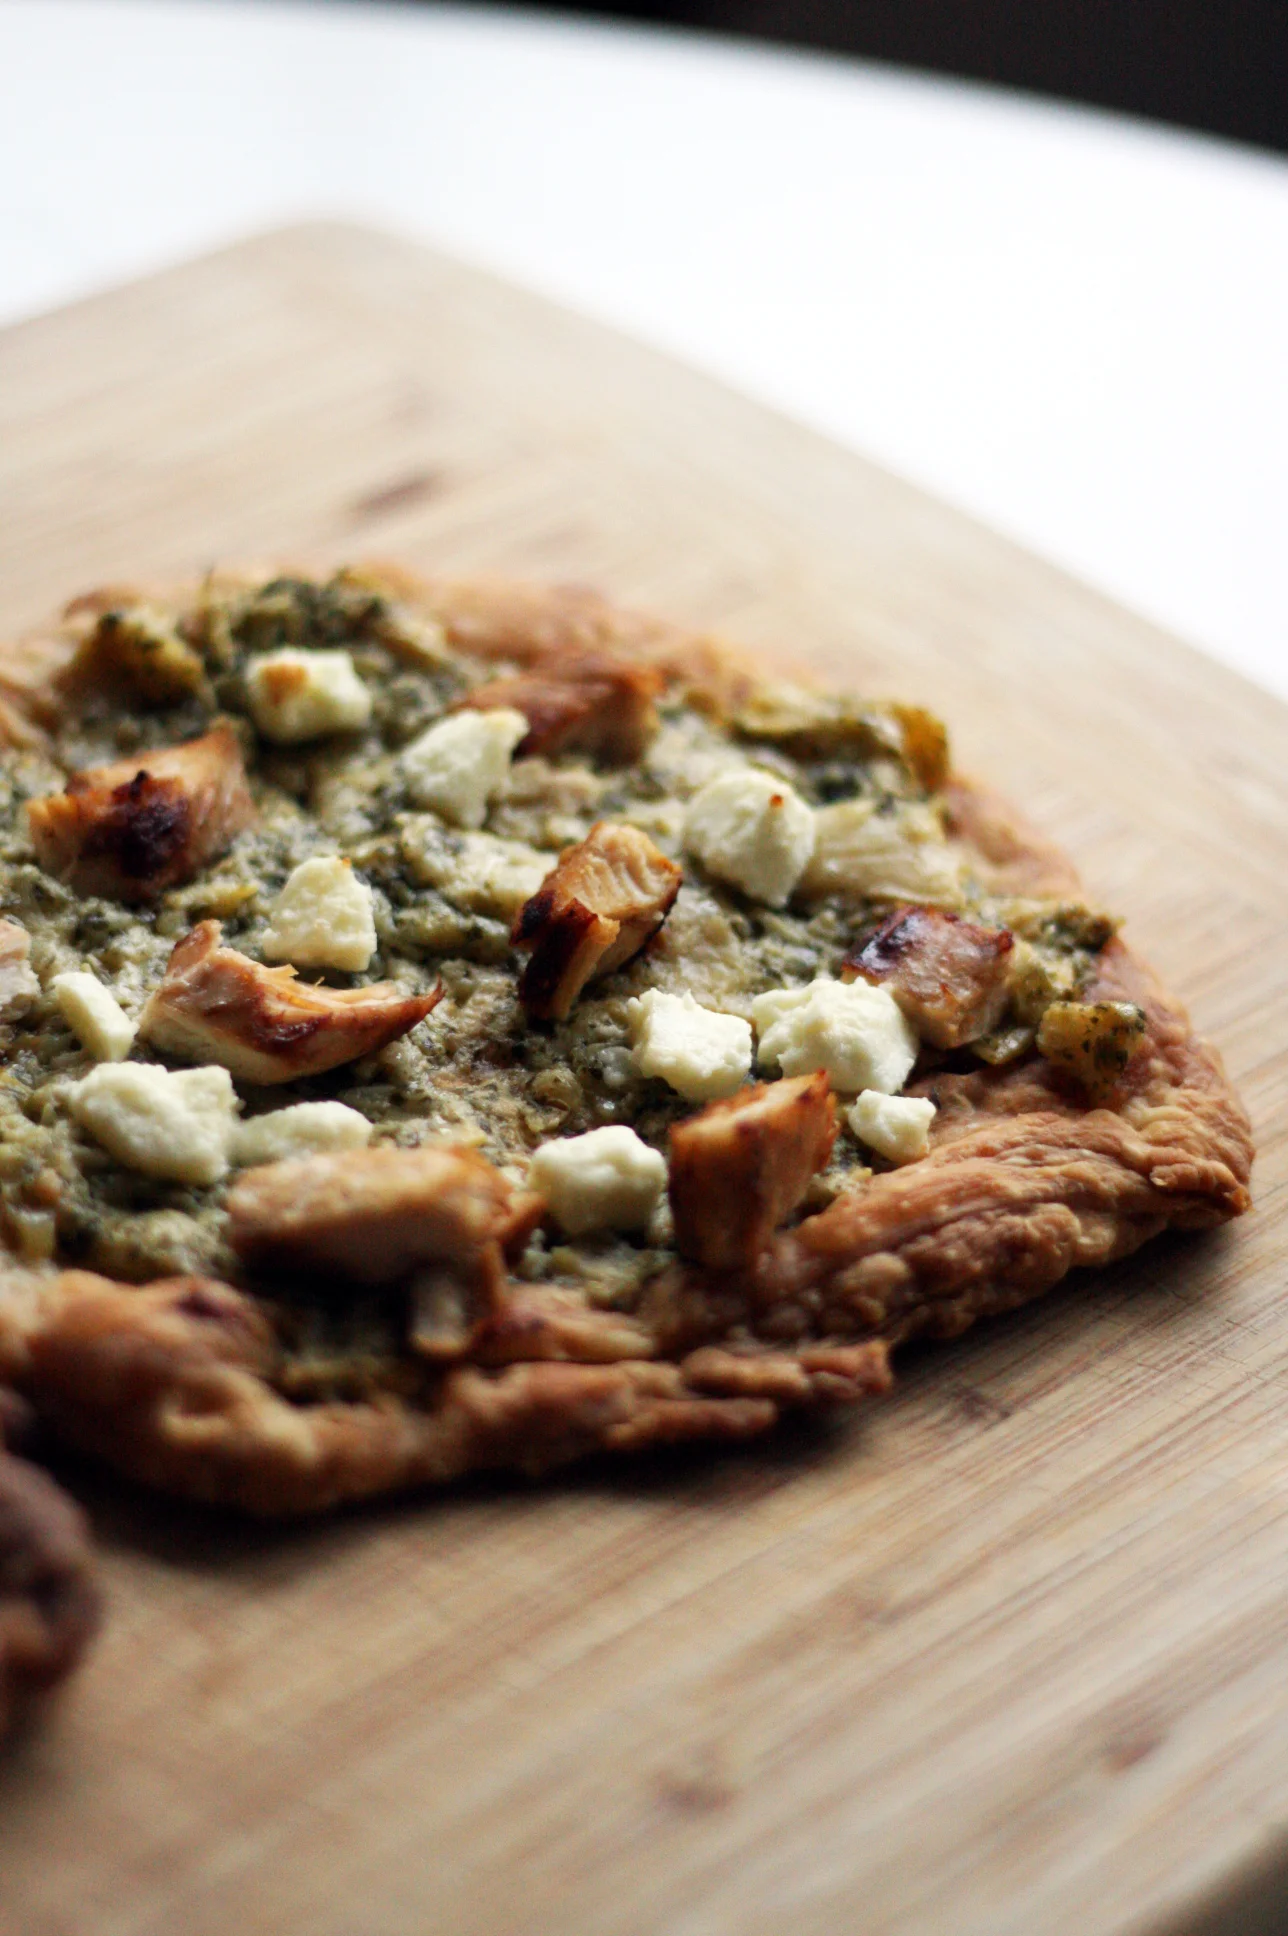
  4. Brush with olive oil then add sauce, toppings, and cheese. Shut the lid and turn your grill to low. (For the pizza in the pictures, I made an impromptu sauce with a few semi-sun-dried tomatoes and roasted garlic in a food processor and topped with whole sun dried tomatoes, smoked mozzarella and basil.)
  5. Check it after 5 minutes.  If the bottom is brown and the top is not melted yet, shut off the grill and close the lid for an additional 3 minutes. 
  6. Slide your pizza from the grill to your plate and enjoy!
Recipe: Grilled Sundried Tomato Pizza | SavoryPantryBlog.com
Print Friendly and PDF

Recipe: Easy Bruschetta Mini Pizzas

Homemade pizza doesn't have to be complicated to be delicious.  With a pre-made crust and a jar of Elki bruschetta, you're just a few steps away from enjoying a fresh baked pizza, made to order.  We used pepperidge farm puff pastry dough to create these 2 mini pizzas.  Sure, it comes in a rectangular sheet, but after it thaws you can reshape it on a floured surface however you like. 

For a twist on the classic margherita pizza, we used the Elki Artichoke Tomato Bruschetta.  The bruschetta spread functions as both a sauce and topping, making your pizza building even easier.  Next, we threw on some fresh water mozzarella before baking and finally topped the cooked pizza with sliced tomatoes and fresh basil leaves.

For our second pizza, we used the Elki Artichoke Lemon Pesto.  You could really just use this spread and keep it simple, but we went ahead and added feta cheese, and chopped chicken breast pieces.  (This is a great opportunity to "clean out the fridge" and get creative with toppings!)  A great pizza for someone who isn't fond of red sauce.

We hope you'll take inspirations from our mini pizzas, and create your own with a variety of topping and bruschetta spread combinations!  One mini pizza is perfect for a single entree or slice them for a shared appetizer.

Easy Bruschetta Mini Pizzas | SavoryPantry.com

Easy Bruschetta Mini Pizzas

  1. Preheat your oven to 400.  Once the dough has thawed (on the counter 45 minutes), prepare your work surface with a dusting of flour.  Divide the dough in half to form 2 balls. Roll out with a rolling pin.  Turn up edges around each pizza to forma small crust.
  2. Place the 2 pizzas on an ungreased cookie sheet and prick all over with a fork.  Bake for 10-15 minutes.
  3. Remove the pre-baked crusts from the oven and spread each with the Elki Artichoke Tomato Bruschetta & Elki Artichoke Lemon Pesto
  4. Top the Artichoke Tomato pizza with fresh mozzarella.  Top the Artichoke Lemon Pesto pizza with feta and chicken.  Return to the oven for another 10-15 minutes.
  5. Remove from the oven.  Top the Artichoke Tomato pizza with fresh tomato slices and basil leaves. 
Easy Bruschetta Mini Pizzas | SavoryPantry.com
Print Friendly and PDF

Pinterest Roundup: Pizza! Pizza!

So many pizzas, so little time.  From highbrow (think truffle oil and smoked cheese) to lowbrow (good old pepperoni), everyone has a favorite.  We've rounded up our favorites from Pinterest. We hope you will find pizza inspiration and share a few of your favorites in our comments section!

Don't let this one fool you - you won't have to wear your "comfy pants" to enjoy this Cauliflower Pizza Crust (Gluten Free).  Fresh tomatoes and basil never let anyone down.

We love any meal that can be prepared in a cast iron skillet, and pizza is no exception. This Mushroom and Brie Pizza with Whole Wheat Beer Crust is just begging for a sprinkling of sea salt and a glass of red wine.

While this Red Onion & Olive Tart is not technically a pizza, who would deny the title to a crust that looks this good?  Looks like a great way to use try out a variety of olives

With FIVE types of cheese (yes, ricotta is one of them!), this White Pizza with Spinach and Bacon is making us want to get up from our desks and preheat the oven RIGHT NOW!

We can't roundup pizzas without including the most popular of toppings - pepperoni!  Rosemary adds a depth of flavor you won't find delivered in 30 minutes or less.  Get the recipe for 3 Cheese Rosemary and Pepperoni Pizza >

Print Friendly and PDF
In Tags

Recipe: Stacked Watermelon Pesto Bites

Cool, sweet watermelon pairs beautifully with salty cheese and pesto in the super simple recipe that celebrates summer.  Layer watermelon, cheese and pesto in tall stacks for a salad presentation or make individual "bites" for grazing.  If you're making the individual bites and want to forego the fork, we found that leaving the rind on makes them easier to handle!  We used asiago cheese, but you could try pairing any of our Elki spreads with various types of melon and cheese for endless culinary combinations.

Recipe: Stacked Watermelon Pesto Bites | SavoryPantryBlog.com

Stacked Watermelon Pesto Bites

  1. Start with a chilled seedless watermelon. (We found that serving the watermelon chilled and the pesto at room temp, was a nice balance)
  2. Slice watermelon into cubes (for stacking) or wedges (for bites).
  3. Layer with thin slices of asiago cheese.
  4. Top with the pesto.
  5. Garnish with a basil leaf or continue layering to your desired height for a salad stack.

DOWNLOAD PRINTABLE RECIPE PDF >

Recipe: Stacked Watermelon Pesto Bites | SavoryPantryBlog.com
Print Friendly and PDF

Recipe: Grilled Summer Caesar Salad

The mix of temperature throughout the salad and the crispiness of the lettuce with the combination of the charred pieces makes grilled salads one of my favorite summer dishes.  Last night, right before the sun set and the rain came in, I made a very simple grilled salad. It was the perfect side dish to the salmon I grilled.  You can make the salad with different ingredients and pair it with any meat or fish.  Make sure to try this dressing - its a garlic lovers dream!

Grilled Summer Caesar Salad | SavoryPantryBlog.com

Grilled Salad with Garlic Parmesan Dressing

Garlic Parmesan Dressing

In a food processor or blender, start the blades and then add the cloves of garlic one at a time. After chopped, slowing add the olive oil.  Let blend for 30 to 40 seconds. The olive oil will look white. Using a mesh strainer, strain the olive oil mixture, capturing most of the garlic  (leave any garlic that is stuck to the sides of the food processor). Put garlic infused olive oil to the side. Add mayo, worcestershire sauce, parmesan cheese and lemon juice to the food processor and blend. After combined, slowly add the garlic infused olive oil to the rest of the mixture.  Keep in an airtight container for up to two weeks.

Grilled Summer Caesar Salad | SavoryPantryBlog.com

Grilled Salad

  • Romaine Hearts sliced in half
  • Tomatoes
  • Shallots
  • Salt & pepper to taste

Preheat grill on medium.

Pour a bit of olive oil in your hands, rub over all your salad ingredients, and sprinkle with salt and pepper.  Place each item on the grill and close lid.  Watch the lettuce closely, they take about 2-3 minutes on each side. Tomatoes and onions should take 5 minutes on each side.  

Plate all of the ingredients, dress, sprinkle a little parmesan cheese and enjoy!

Grilled Summer Caesar Salad | SavoryPantryBlog.com
Print Friendly and PDF